inkel

Software programmer interested in SRE, DevOps, Machine Learning and Augmented Reality.


Working at Theorem: a typical day

4min.

I’ve joined CitrusbyteTheorem 9 years ago, and since day 1 it was a fully remote experience. Over the years I’ve learned lots about how to organize myself to approach each new workday although never gave much thought to it, until a few days ago, when while interviewing a candidate he asked what does a typical day at Theorem looks like. This post will try to address that question.

First and foremost, a disclaimer: by no means I speak on behalf of Theorem or the rest of my teammates; these are entirely my own experiences and do not reflect the reality of all the great people working at this company.

I live with my girlfriend and our two lovely kids (4 years old and 1 year and a half), so keep that in mind while reading this post.

As you are aware, at the time of writing this post we are living in very strange times, throughout a global pandemic that has most of the world in quarantine with people confined to their places and working remotely. As stated earlier, at Theorem we are 100% remote since the beginning, so the COVID-19 pandemic didn’t change much on how we work, although it had some effects.

Pre-pandemic typical workday

I have an office 20 blocks away from home, and my kids went to kindergarten 4 blocks away from the office, so days started at 6:15 am to enjoy breakfast with the family, then we would drive the kids to school, drop them and head to the office. My workdays usually started, then, at 8:00 am.

Office

The very first thing I usually do any given day is going through my emails and any pending notification from the day before. If something requires my attention immediately I answer right at it, otherwise, I either archive or snooze the message to a later time if required.

Next is checking the status of any ongoing task I have been working previously, and paving the way for what’s next. Then, off to work.

Around noon either myself or my girlfriend goes to pick up the kids from school, and takes them home to have lunch, and then back to the office. If I’m the one picking them, I do that during my lunch break, and then have a quick bite or snack. Otherwise, I cook something for myself or order some delivery. During this break I might read or watch something.

Then the rest of the day goes on, until 4:00 pm or 5:00 pm, depending on the day, and walk back home. And that concludes a typical workday.

Typical workday during the pandemic

Things have changed, clearly. We don’t wake up anymore at 6:15 am, now it’s usually at around 8:00 am. Breakfast is served, and I use this time to catch up on some news and go through my emails and notifications, again snoozing for an hour or so whatever needs my attention; the rest is archived.

I’ve set up a standing desk in my bedroom, which is right next to the living room, where the kids spend most of their time playing. The biggest change since the pandemic was that nowadays I don’t have long stretches of work time anymore, so I try and split my tasks into smaller time schedules, so I can take a look at my kids, play with them or help them with homework (yes, even my 1.5 years old daughter has Zoom meetings now.)

Work from home Work from home

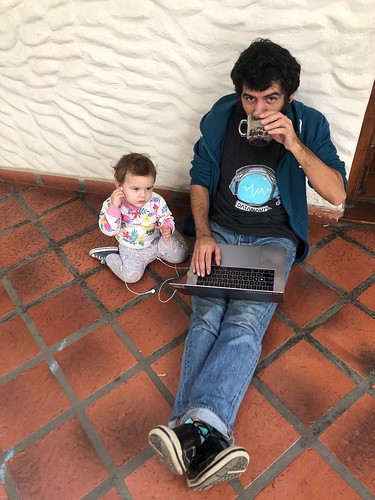
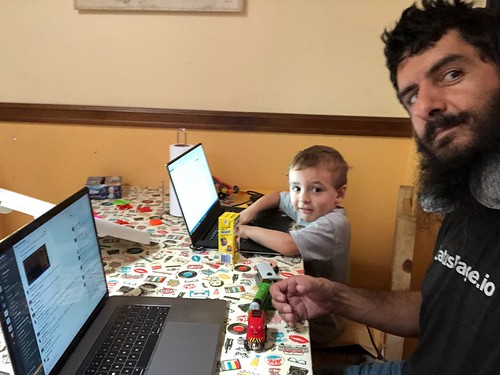
Working from home with kids

Lunch and dinner are usually planned the night before, so at around noon either me or my girlfriend starts preparing lunch. The kids love this time as they get to watch something on Netflix. I had to cancel all my meetings during this time, but that doesn’t seem to have affected my work. Asynchronous communication works great!

After lunch work continues, and I might be able to get some work-only hours if the kids decide to nap, otherwise, again it’s split into smaller chunks of time. Either way, I’m still able to drive my commitments to success.

Conclusions

As you can see, not much has changed, other than how many hours in stretch I can work without interruptions. All other work details were already in place given that we are a 100% remote company. The biggest takeaway, for me, is that in order to survive this crazy new world we are living in, you need to work with great people, who understand not all experiences are equal, who trust you will work with professionalism and responsibility, and who you trust back in the same way.

If you like what you read and you would like to form part of this great team, check our careers page and apply to any of our current openings. Who knows? Perhaps your dream job is just waiting for you.


CLI sort tricks

2min.

If you are like me you might have used the sort(1) CLI utility more than once in your life. Today, I’ve found a trick that I’ve never used before, and hopefully it will help someone else in the future.

Say that we have the following file to sort:

fpdy 01 08 wcfo
juvi 01 02 ejan
urbx 04 03 ckbw
fkzq 01 08 myaz
fjie 04 09 rhvo
almv 04 02 adhs
cuah 07 04 gbyt
chok 09 06 nqwo
emjd 01 04 ledx
npto 02 10 nqsc

Now, supposed that I wanted to sort first by the third column and then for the second one, then one would do sort -k 3 foo.txt. Easy. But what if instead the source file looked like this and I wanted the same results?

fpdy 0108 wcfo
juvi 0102 ejan
urbx 0403 ckbw
fkzq 0108 myaz
fjie 0409 rhvo
almv 0402 adhs
cuah 0704 gbyt
chok 0906 nqwo
emjd 0104 ledx
npto 0210 nqsc

Well, tricky, right? Not really: the -k accepts the format F[.C], where F is the field number (2 in our case) and C is the character position within the field (4 in our case) so if we run the following we will achieve what we are looking for:

$ sort -k 2.4 foo.txt
almv 0402 adhs
juvi 0102 ejan
urbx 0403 ckbw
cuah 0704 gbyt
emjd 0104 ledx
chok 0906 nqwo
fkzq 0108 myaz
fpdy 0108 wcfo
fjie 0409 rhvo
npto 0210 nqsc

Why 4 and not 3, I don’t know, but I think it’s taking the separator into account. I need to investigate more. But so far I haven’t the need to do something as fine-grained as this, so I can still sleep well at night.


Testing Terraform Providers

3min.

If there’s one piece of technology I’ve come to love and depend upon these last years it definitely is Terraform. Sadly, the only provider that seems to be complete is the AWS provider, but others seems to be missing some useful resources or data sources. As an example, these past days at work I had to work with the Azure provider and found that I was really missing the ability to query Azure for Virtual Machine IDs, but there wasn’t a data source for this, and I didn’t want to import the virtual machines we’ve already created (insert long story reasons here).

But then I remember that Terraform and its providers are written in Go, so I took it to add the resource myself.

This post isn’t about how to write providers, the folks at Hashicorp already wrote a guide to write custom providers which is pretty useful. But I’ve found that there was something missing, or that I didn’t fully understood, and that was how can I test my changes are working?.

Most if not all providers have unit and acceptance tests that allow to test that the changes we introduced work as expected, which are great for once you want to send a pull request, but I am the type of programmer that likes to try things in the Real World™ before going into the TDD workflow, so I fired up my editor and start hacking on adding a new data source that would allow me to query a virtual machine ID by name. After a few tries, I’ve got something that looked about right, but then the question came: how do I test it? If I run terraform init it uses the published provider, which obviously doesn’t have the changes I made. I’ve found in the documentation some references as to where can you place third-party providers on your machine for testing, but that didn’t really work as it was missing, IMO, some information. Luckily, I’ve found some pointers in another document that explains how Terraform works, but that was still missing some information. After a while, I’ve found the solution, and here it is:

  • Git clone Azure Terraform provider source code.
  • Make the changes.
  • Run go build. This will generate a terraform-provider-azurerm executable in your current directory.
  • Move the executable to the discovery folder: mv terraform-provider-azurerm ~/.terraform.d/plugins/darwin_amd64/
  • Go to a folder with some Terraform configuration that uses the Azure provider.
  • Remove the cached version: rm -rv .terraform/plugins/ (this will remove all plugins, but don’t worry)
  • Run terraform init
  • Profit!

Now I can test my changes with a live Terraform configuration.


Proxy Protocol Support in Curl

1min.

I’ve came across the following tweet the other day, and I couldn’t be more excited:

This is exciting to me as the work I’ve been doing in viaproxy had one caveat: testing it works was a bit convoluted, as I was doing by running an HAProxy instance with a custom configuration like the following:

global
    debug
    maxconn 4000
    log 127.0.0.1 local0

defaults
    timeout connect 10s
    timeout client  1m
    timeout server  1m

listen without-send-proxy
    mode tcp
    log global
    option tcplog
    bind *:17654
    server app1 127.0.0.1:7655

listen with-send-proxy
    mode tcp
    log global
    option tcplog
    bind *:27654
    bind ipv6@:27654
    server app1 127.0.0.1:7654 send-proxy

Luckily commit 6baeb6df adds a new --haproxy-protocol that, as documented, will do the following:

Send a HAProxy PROXY protocol header at the beginning of the connection. This is used by some load balancers and reverse proxies to indicate the client’s true IP address and port.

This option is primarily useful when sending test requests to a service that expects this header.

Reading the commit changes is very enlightening, too, as it is a great example of nice and simple C code. I’m looking forward to the release!


Using responsive font sizes

1min.

Today Chad Ostrowski, a fellow engineer at Citrusbyte, shared an article he wrote: CSS pro tips: responsive font-sizes and when to use which units. After reading it, I couldn’t help myself and adapted some of the tips there to this site. It’s now much easier to maintain, I think, as I’ve removed all previous media queries, but I had to add one:

@media only screen and (min-device-width: 1200px) {
  html { font-size: calc(1em + 0.5vw); }
}

Without this the text on my machine looks too big. I need to work on this, I think.


From PEM to OpenSSH for usage in ~/.ssh/authorized_keys

1min.

Say you have a private key in PEM format, and you want to use that key for SSH into another server, by adding an entry to your ~/.ssh/authorized_keys file with the public key of such PEM file. The following command will parse your PEM file and output the required RSA format used in authorized_keys:

ssh-keygen -y -f path/to/file.pem

This will output a ssh-rsa AAAA… string that is safe to append to your ~/.ssh/authorized_keys. The ssh-keygen uses the -f flag to specify the input file name, and the -y flag to read a private file and output the OpenSSH public key to standard output.


lruc: a reverse cURL

2min.

Today Thorsten Ball asked a simple question on Twitter:

After a brief exchange of tweets, I said:

Twenty minutes later lruc was born.

It’s still very fresh and missing many features, but basically it is a web server that allows you to configure it to always respond with a custom response without too much hassle. The usage is very simple:

Usage of lruc:
  -addr string
        Address to listen for requests (default ":8080")
  -body -
        Response body. Use - to read from a stdin (default "Hello, World!")
  -code int
        HTTP response code (default 200)
  -content-type string
        Content-Type (default "text/plain")

Say that you want to create a server that always respond with a 404 Not Found and a body of No se pudo encontrar lo que buscaba (Spanish for Couldn’t find what you were looking for (sort of)) on port 7070, then you could execute the following:

lruc -addr :7070 -code 404 -body "No se pudo encontrar lo que buscaba"

Or say that you want to always return an image, then you could do something like:

< image.png lruc -content-type image/png -body -

# Or in an useless use of cat
cat image.png | lruc -content-type image/png -body -

This seems like an interesting tool to keep working on, so watch github.com/inkel/lruc for updates.

PS: did I said already that I love Go?


EC2 Key Pairs Fingerprinting

1min.

Ever happened to you that you wanted to know which SSH key you need to connect to an AWS EC2 instance? I always found that the fingerprints don’t tell me much, espcially because I always forget how to compute the fingerprints. Good that I’m back to writing, so I’m dumping my memory here:

  • if the key was generated by AWS, then use openssl pkcs8 -in path/to/key.pem -nocrypt -topk8 -outform DER | openssl sha1 -c
  • if the key was generated using ssh-keygen then use openssl rsa -in path/to/private/key -pubout -outform DER | openssl md5 -c

Why does AWS uses one format and why SSH other? Escapes my current knowledge.


On Go package names

2min.

Or why I renamed github.com/inkel/go-proxy-protocol to github.com/inkel/viaproxy.

In my previous article I introduced a repository that hold the code to create net.Conn objects aware of the proxy protocol, but I wasn’t happy with the name of the repository.

Package names are important in Go, and one aspect that we tend to overlook is that they actually are part of the calling signature when you want to use an export type or function. With the previous code, if we wanted to use the net.Conn wrapper we would have to first import the library:

import "github.com/inkel/go-proxy-protocol/conn"

Once we did that, then to wrap a connection we would have to call:

newCn, err := conn.WithProxyProtocol(cn)

Similarly if we wanted to use the net.Listen alternative, we should’ve had to import github.com/inkel/go-proxy-protocol/listen and then call cn, err := listen.WithProxyProtocol. This doesn’t look right to my eyes, and hopefully not to yours either. And aside aesthetics, two packages for such limited code? Doesn’t make much sense.

So I spent the day thinking on a better name that could allow me to better convey the effect we want to achieve and that fits in just one library, and thus, github.com/inkel/viaproxy came to be. Let’s see how better the code would look like now when wrapping a connection:

// import the package
import "github.com/inkel/viaproxy"

// wrap the connection
newCn, err := viaproxy.Wrap(cn)

Similarly if you want to use the net.Listener, the code looks just as well (and I might even add that looks better):

// import the package
import "github.com/inkel/viaproxy"

// create the listener
ln, err := viaproxy.Listen("tcp", ":1234")

It certainly looks much better, and I hope you agree.


Proxy Protocol: what is it and how to use it with Go

6min.

Today I became aware of the proxy protocol.

The Proxy Protocol was designed to chain proxies / reverse-proxies without losing the client information.

If you are proxying an HTTP(S) server, chances are that you have used the X-Forwarded-From header to keep the real remote address of the client making the request and not receving the proxy’s address instead. But this only works for HTTP(S): if you are proxying any other kind of TCP service, you are doomed.

Take for instance the following example: we will have a simple TCP server that echo backs the client’s remote address:

package main

import (
	"fmt"
	"io/ioutil"
	"log"
	"net"
)

func main() {
	ln, err := net.Listen("tcp", ":7654")
	if err != nil {
		log.Fatal(err)
	}

	for {
		cn, err := ln.Accept()
		if err != nil {
			log.Println("ln.Accept():", err)
			continue
		}

		go handle(cn)
	}
}

func handle(cn net.Conn) {
	defer func() {
		if err := cn.Close(); err != nil {
			log.Println("cn.Close():", err)
		}
	}()

	log.Println("handling connection from", cn.RemoteAddr())

	fmt.Fprintf(cn, "Your remote address is %v\n", cn.RemoteAddr())

	data, err := ioutil.ReadAll(cn)
	if err != nil {
		log.Println("reading from client:", err)
	} else {
		log.Printf("client sent %d bytes: %q", len(data), data)
	}
}

I’m running go run server.go in a machine whose IP is 192.168.1.20, and I’ll be sending requests from another machine whose IP is 192.168.1.12. One the server machine I’m also running an https://www.haproxy.org/ server that acts as a proxy to the Go program above:

global
    debug
    maxconn 4000
    log 127.0.0.1 local0

defaults
    timeout connect 10s
    timeout client  1m
    timeout server  1m

listen wo-send-proxy
    mode tcp
    log global
    option tcplog
    bind *:17654
    server app1 192.168.1.20:7654

listen w-send-proxy
    mode tcp
    log global
    option tcplog
    bind *:27654
    server app1 192.168.1.20:7654 send-proxy

This configuration creates 2 proxies: one listening on port 17654 which just proxies the client connection to the server, and another proxy listening in port 276564 which does the same but it also enables using the proxy protocol by using the send-proxy keyword.

On the client machine, I’m running the following to send requests directly to the Go server, via the regular proxy and via the proxy with proxy protocol enabled:

$ for port in {,1,2}7654; do echo inkel | nc 192.168.1.20 ${port}; done
Your remote address is 192.168.1.12:44966
Your remote address is 192.168.1.20:57680
Your remote address is 192.168.1.20:57681

As you can see in the first case the client is informed that its remote address is 192.168.1.12, which is correct, but in both the other cases it says 192.168.1.20, which is the address of the proxy. Let’s check what the server has to say in its output:

$ go run server.go
2017/10/13 11:50:54 handling connection from 192.168.1.12:44966
2017/10/13 11:50:54 client sent 6 bytes: "inkel\n"
2017/10/13 11:50:54 handling connection from 192.168.1.20:57680
2017/10/13 11:50:54 client sent 6 bytes: "inkel\n"
2017/10/13 11:50:54 handling connection from 192.168.1.20:57681
2017/10/13 11:50:54 client sent 56 bytes: "PROXY TCP4 192.168.1.12 192.168.1.20 58472 27654\r\ninkel\n"

Here something interesting happens: the first connection, the one made directly to the Go server, properly shows the remote address as 192.168.1.12 and the contents. The second and third ones incorrectly report the remote address as 192.168.1.20 but the third one shows something interesting in what was received from the client: instead of just receiving inkel it first received PROXY TCP4 192.168.1.12 192.168.1.20 58472 27654\r\n. This is what proxy protocol does, and if you see clearly, the client’s actual IP address is there!

The proxy protocol, when enabled, will send the following initial line to the proxied server:

PROXY <inet protocol> <client IP> <proxy IP> <client port> <proxy port>\r\n

The actual specification is fairly simple, and now we can see why the only condition for proxy protocol to work is that both endpoints of the connection MUST be compatible with proxy protocol.

This explains why the Go server isn’t reporting the right remote address, even when proxy protocol is used: the net package doesn’t (currently) supports proxy protocol. But adding support to it isn’t too difficult. Here we have a custom connection type that complies with the net.Conn interface:

type myConn struct {
	cn      net.Conn
	r       *bufio.Reader
	local   net.Addr
	remote  net.Addr
	proxied bool
}

func NewProxyConn(cn net.Conn) (net.Conn, error) {
	c := &myConn{cn: cn, r: bufio.NewReader(cn)}
	if err := c.Init(); err != nil {
		return nil, err
	}
	return c, nil
}

func (c *myConn) Close() error                { return c.cn.Close() }
func (c *myConn) Write(b []byte) (int, error) { return c.cn.Write(b) }

func (c *myConn) SetDeadline(t time.Time) error      { return c.cn.SetDeadline(t) }
func (c *myConn) SetReadDeadline(t time.Time) error  { return c.cn.SetReadDeadline(t) }
func (c *myConn) SetWriteDeadline(t time.Time) error { return c.cn.SetWriteDeadline(t) }

func (c *myConn) LocalAddr() net.Addr  { return c.local }
func (c *myConn) RemoteAddr() net.Addr { return c.remote }

func (c *myConn) Read(b []byte) (int, error) { return c.r.Read(b) }

func (c *myConn) Init() error {
	buf, err := c.r.Peek(5)
	if err != io.EOF && err != nil {
		return err
	}

	if err == nil && bytes.Equal([]byte(`PROXY`), buf) {
		c.proxied = true
		proxyLine, err := c.r.ReadString('\n')
		if err != nil {
			return err
		}
		fields := strings.Fields(proxyLine)
		c.remote = &addr{net.JoinHostPort(fields[2], fields[4])}
		c.local = &addr{net.JoinHostPort(fields[3], fields[5])}
	} else {
		c.local = c.cn.LocalAddr()
		c.remote = c.cn.RemoteAddr()
	}

	return nil
}

func (c *myConn) String() string {
	if c.proxied {
		return fmt.Sprintf("proxied connection %v", c.cn)
	}
	return fmt.Sprintf("%v", c.cn)
}

type addr struct{ hp string }

func (a addr) Network() string { return "tcp" }
func (a addr) String() string  { return a.hp }

Now in our server we wrap the connection into our new type, and pass it to the handle func:

func main() {
	ln, err := net.Listen("tcp", ":7654")
	if err != nil {
		log.Fatal(err)
	}

	for {
		cn, err := ln.Accept()
		if err != nil {
			log.Println("ln.Accept():", err)
			continue
		}

		pcn, err := NewProxyConn(cn)

		if err != nil {
			log.Println("NewProxyConn():", err)
			continue
		}

		go handle(pcn)
	}
}

With this, now we see the right output in both the client:

$ for port in {,1,2}7654; do echo inkel | nc 192.168.1.20 ${port}; done
Your remote address is 192.168.1.12:45050
Your remote address is 192.168.1.20:60729
Your remote address is 192.168.1.12:58556

…and in the server:

2017/10/13 13:37:45 accepted connection from 192.168.1.12:45056
2017/10/13 13:37:45 client sent 6 bytes: "inkel\n"
2017/10/13 13:37:45 accepted connection from 192.168.1.20:60738
2017/10/13 13:37:45 client sent 6 bytes: "inkel\n"
2017/10/13 13:37:45 accepted connection from 192.168.1.12:58562
2017/10/13 13:37:45 client sent 6 bytes: "inkel\n"

This has been turned into a Go library located at github.com/inkel/go-proxy-protocol. Feel free to use it and send your feedback and error reports!